Using the Python SDK to Automate the Forge
Use the kotharcomputing Python SDK to connect a local Python project to The Forge, run Aleph code on agents, and automate file and job workflows.
API access is currently in limited preview. If you would like access, reach out to the Kothar team so we can discuss your use case and help you get started.
What you will build
In this tutorial, you will:
- Create an API token in the Workshop.
- Create a local Python project (
Python 3.11+). - Install the
kotharcomputingpackage. - Instantiate
KotharClientwith your token. - Look up and set your workspace ID, interactive agent ID, and job agent ID.
- Run a direct Aleph execution and stream output live.
- Create and read an Aleph script file in your workspace.
- Schedule a job for that script.
- Poll the job until it finishes successfully.
- Print job output and delete the script file.
Prerequisites
- Access to The Forge API preview.
- A running agent that can execute Aleph code.
- Python
3.11or newer.
Python installation guides:
- Windows: python.org/downloads/windows
- macOS: python.org/downloads/macos
- Linux: Python docs - Using Python on Unix platforms
Check your version:
python3 --version
Step 1: Create an API token in the Workshop
In the Workshop:
- Click your user icon.
- Select
Manage account. - Open
API tokens. - Create a token and give it a descriptive name so it is easy to identify later.
- Leave all permission checkboxes enabled (default state) for now.
- Optionally set an expiration date, or leave it without one.
- Copy the token value.
Store the token in a secure location (for example, a password manager or secret manager). You cannot view the token value again after creation, and if it leaks, someone else could use it to access your account through the API.
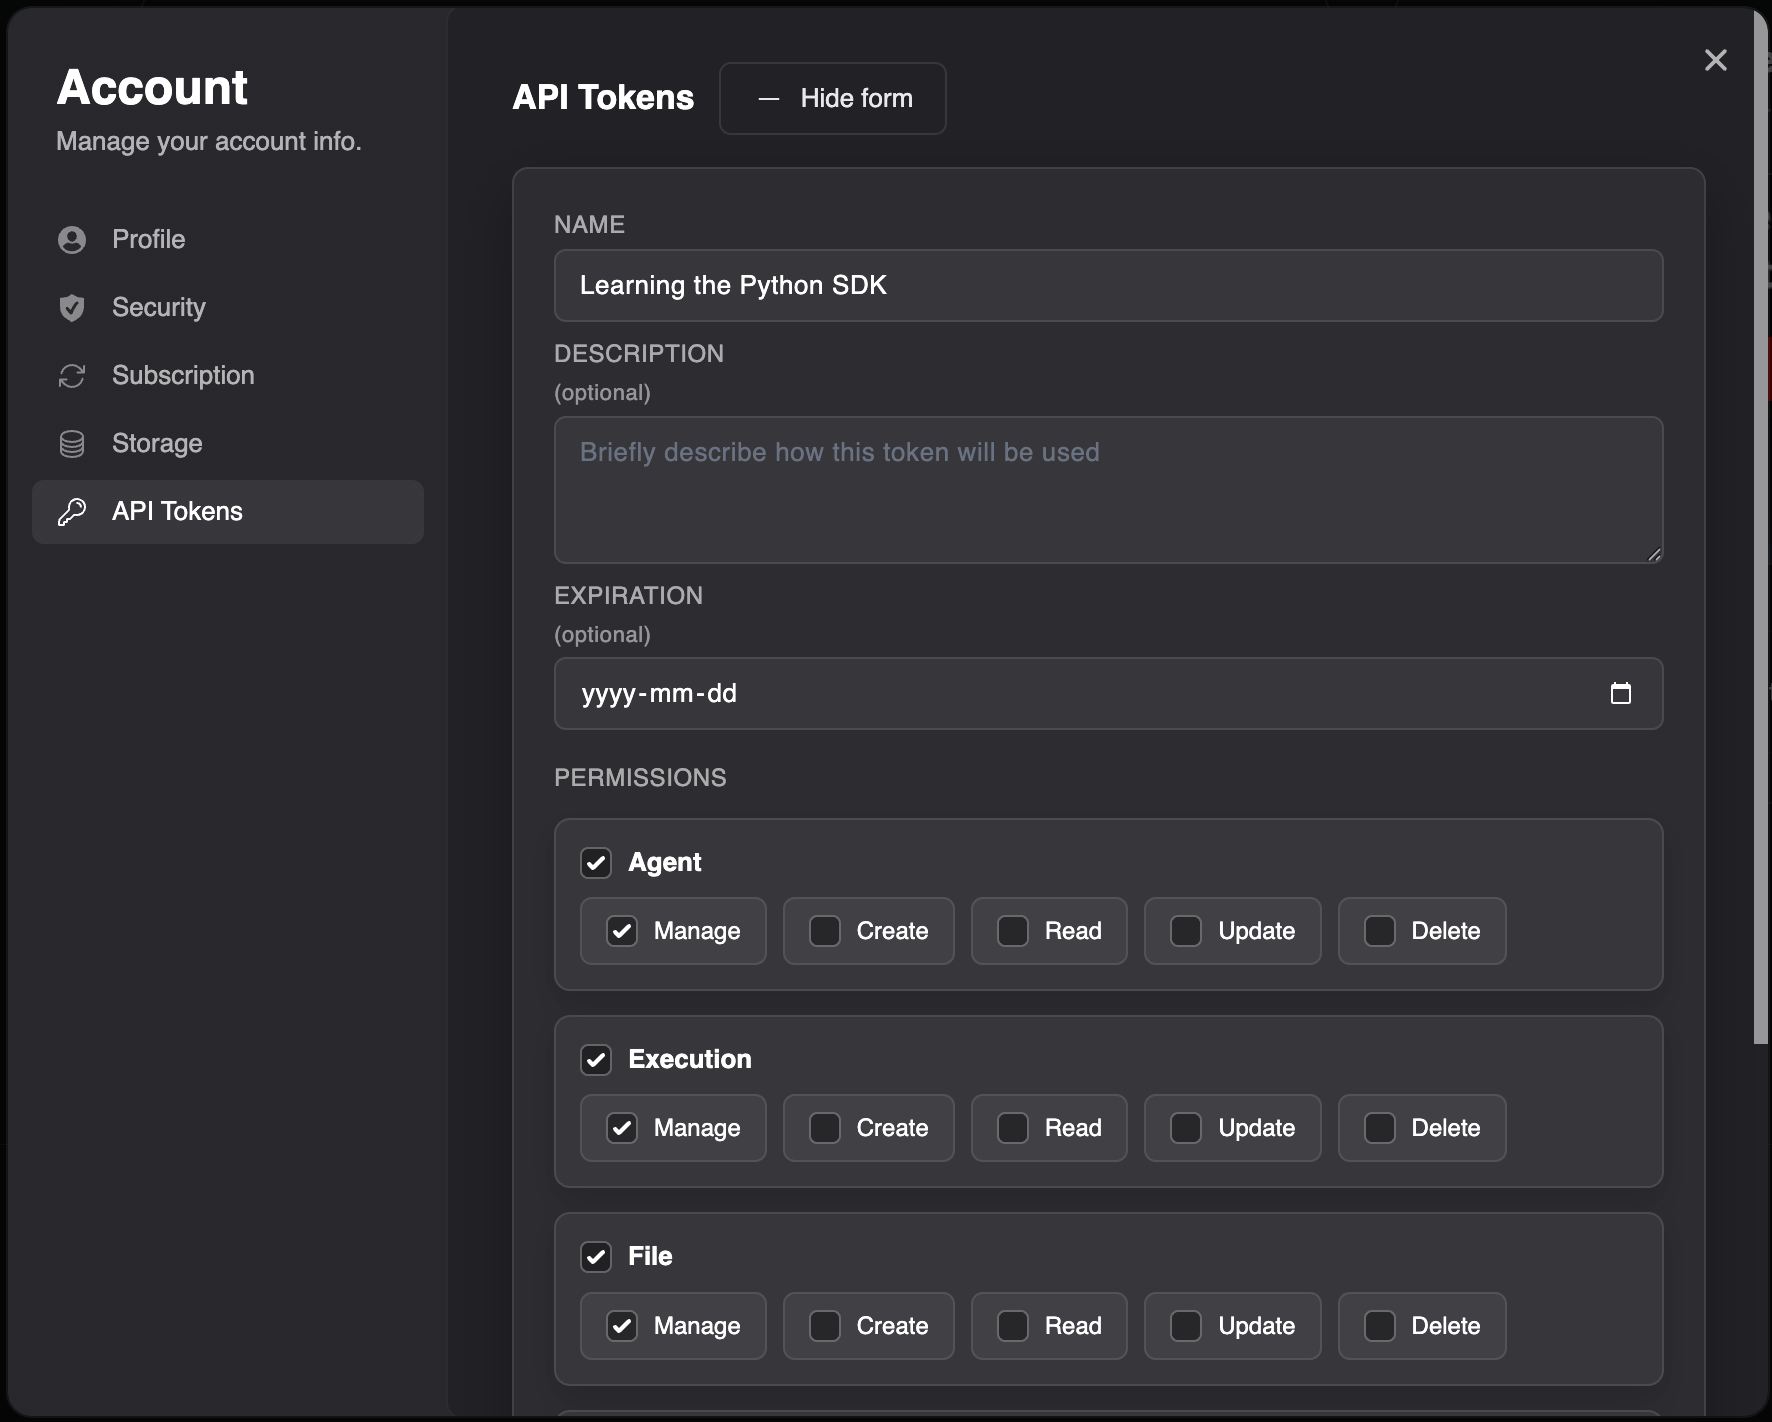
You will use this as a bearer token in the SDK.
Step 2: Copy your workspace ID and agent IDs
In the Workshop:
-
Open
User Preferences, then selectCopy Workspace ID. -
Copy your interactive agent ID (
agent_interactive) for direct executions.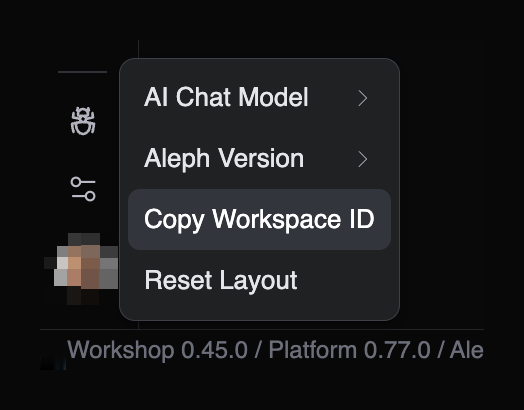
-
Copy a regular agent ID for scheduled jobs.
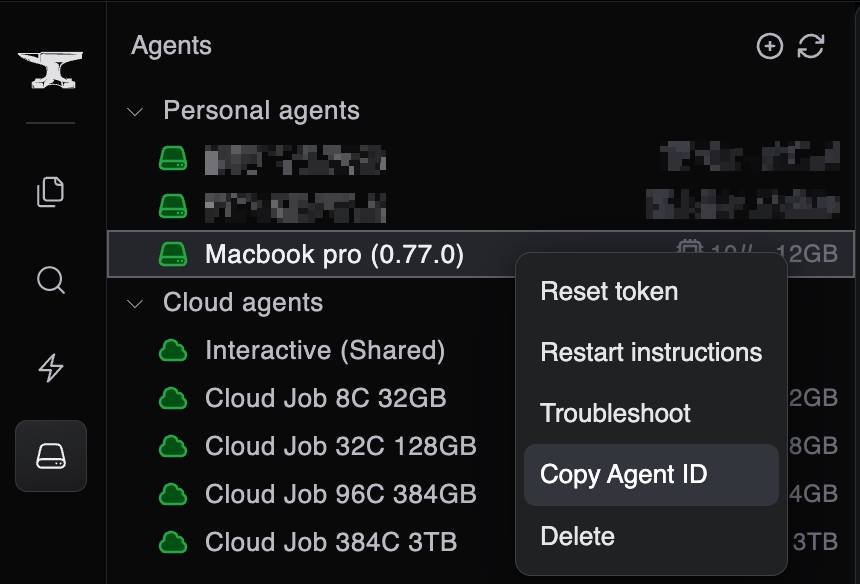
For this tutorial, we will use agent_interactive for the first direct execution example, and you can do the same.
You will need a regular agent ID (not agent_interactive) for job scheduling later in the tutorial.
Step 3: Create a local Python project
If you are new to Python, venv (virtual environment) gives this project its own isolated package environment.
This avoids dependency conflicts with other Python projects on your machine.
- Official docs: Python tutorial - Virtual Environments and Packages
- Packaging guide: Installing packages using pip and virtual environments
mkdir forge-python-sdk-tutorial
cd forge-python-sdk-tutorial

python3 -m venv .venv
source .venv/bin/activate

python -m pip install --upgrade pip
These commands:
python3 -m venv .venv: creates a local virtual environment in the.venvfolder.source .venv/bin/activate: activates the environment sopythonandpipuse this project’s isolated setup.python -m pip install --upgrade pip: updatespipinside the virtual environment.
On Windows PowerShell, activate with:
.venv\Scripts\Activate.ps1
When you are done, run deactivate to leave the virtual environment.
Step 4: Install the SDK
pip install kotharcomputing
Step 5: Run Aleph code in the Python REPL
Start the REPL:
python
Then run:
from kotharcomputing import KotharClient

client = KotharClient(access_token="<your_api_token>")
workspace = client.workspaces.id("<your_workspace_id>")
result = workspace.executions.execute(
    {
        "agentId": "agent_interactive",
        "content": 'print("Hello, world!")',
    },
    on=lambda message: print(message),
)
result.wait(timeout=120)
You should see a series of messages streamed back. One of them is an agent:execution:output message that contains Hello, world!.
Executions are asynchronous and ephemeral. They can stream output while running (via the on callback), and then disappear when finished. Use result.wait(timeout=...) when your local script needs to block until the execution completes.
Step 6: Create a small script from the REPL example
Next, turn this into a reusable Python script.
Create hello_execution.py:
import sys

from kotharcomputing import KotharClient


if len(sys.argv) != 4:
    print("Usage: python hello_execution.py <api_token> <workspace_id> <agent_id>")
    raise SystemExit(1)

api_token, workspace_id, agent_id = sys.argv[1:4]

client = KotharClient(access_token=api_token)
workspace = client.workspaces.id(workspace_id)


def on_message(message: dict[str, object]) -> None:
    if message.get("type") != "agent:execution:output":
        return
    for line in message.get("lines", []):
        print(line)


result = workspace.executions.execute(
    {
        "agentId": agent_id,
        "content": 'print("Hello, world!")',
    },
    on=on_message,
)
result.wait(timeout=120)
Run it:
python hello_execution.py "<your_api_token>" "<your_workspace_id>" "agent_interactive"
This is the same test as Step 5, now in a reusable script.
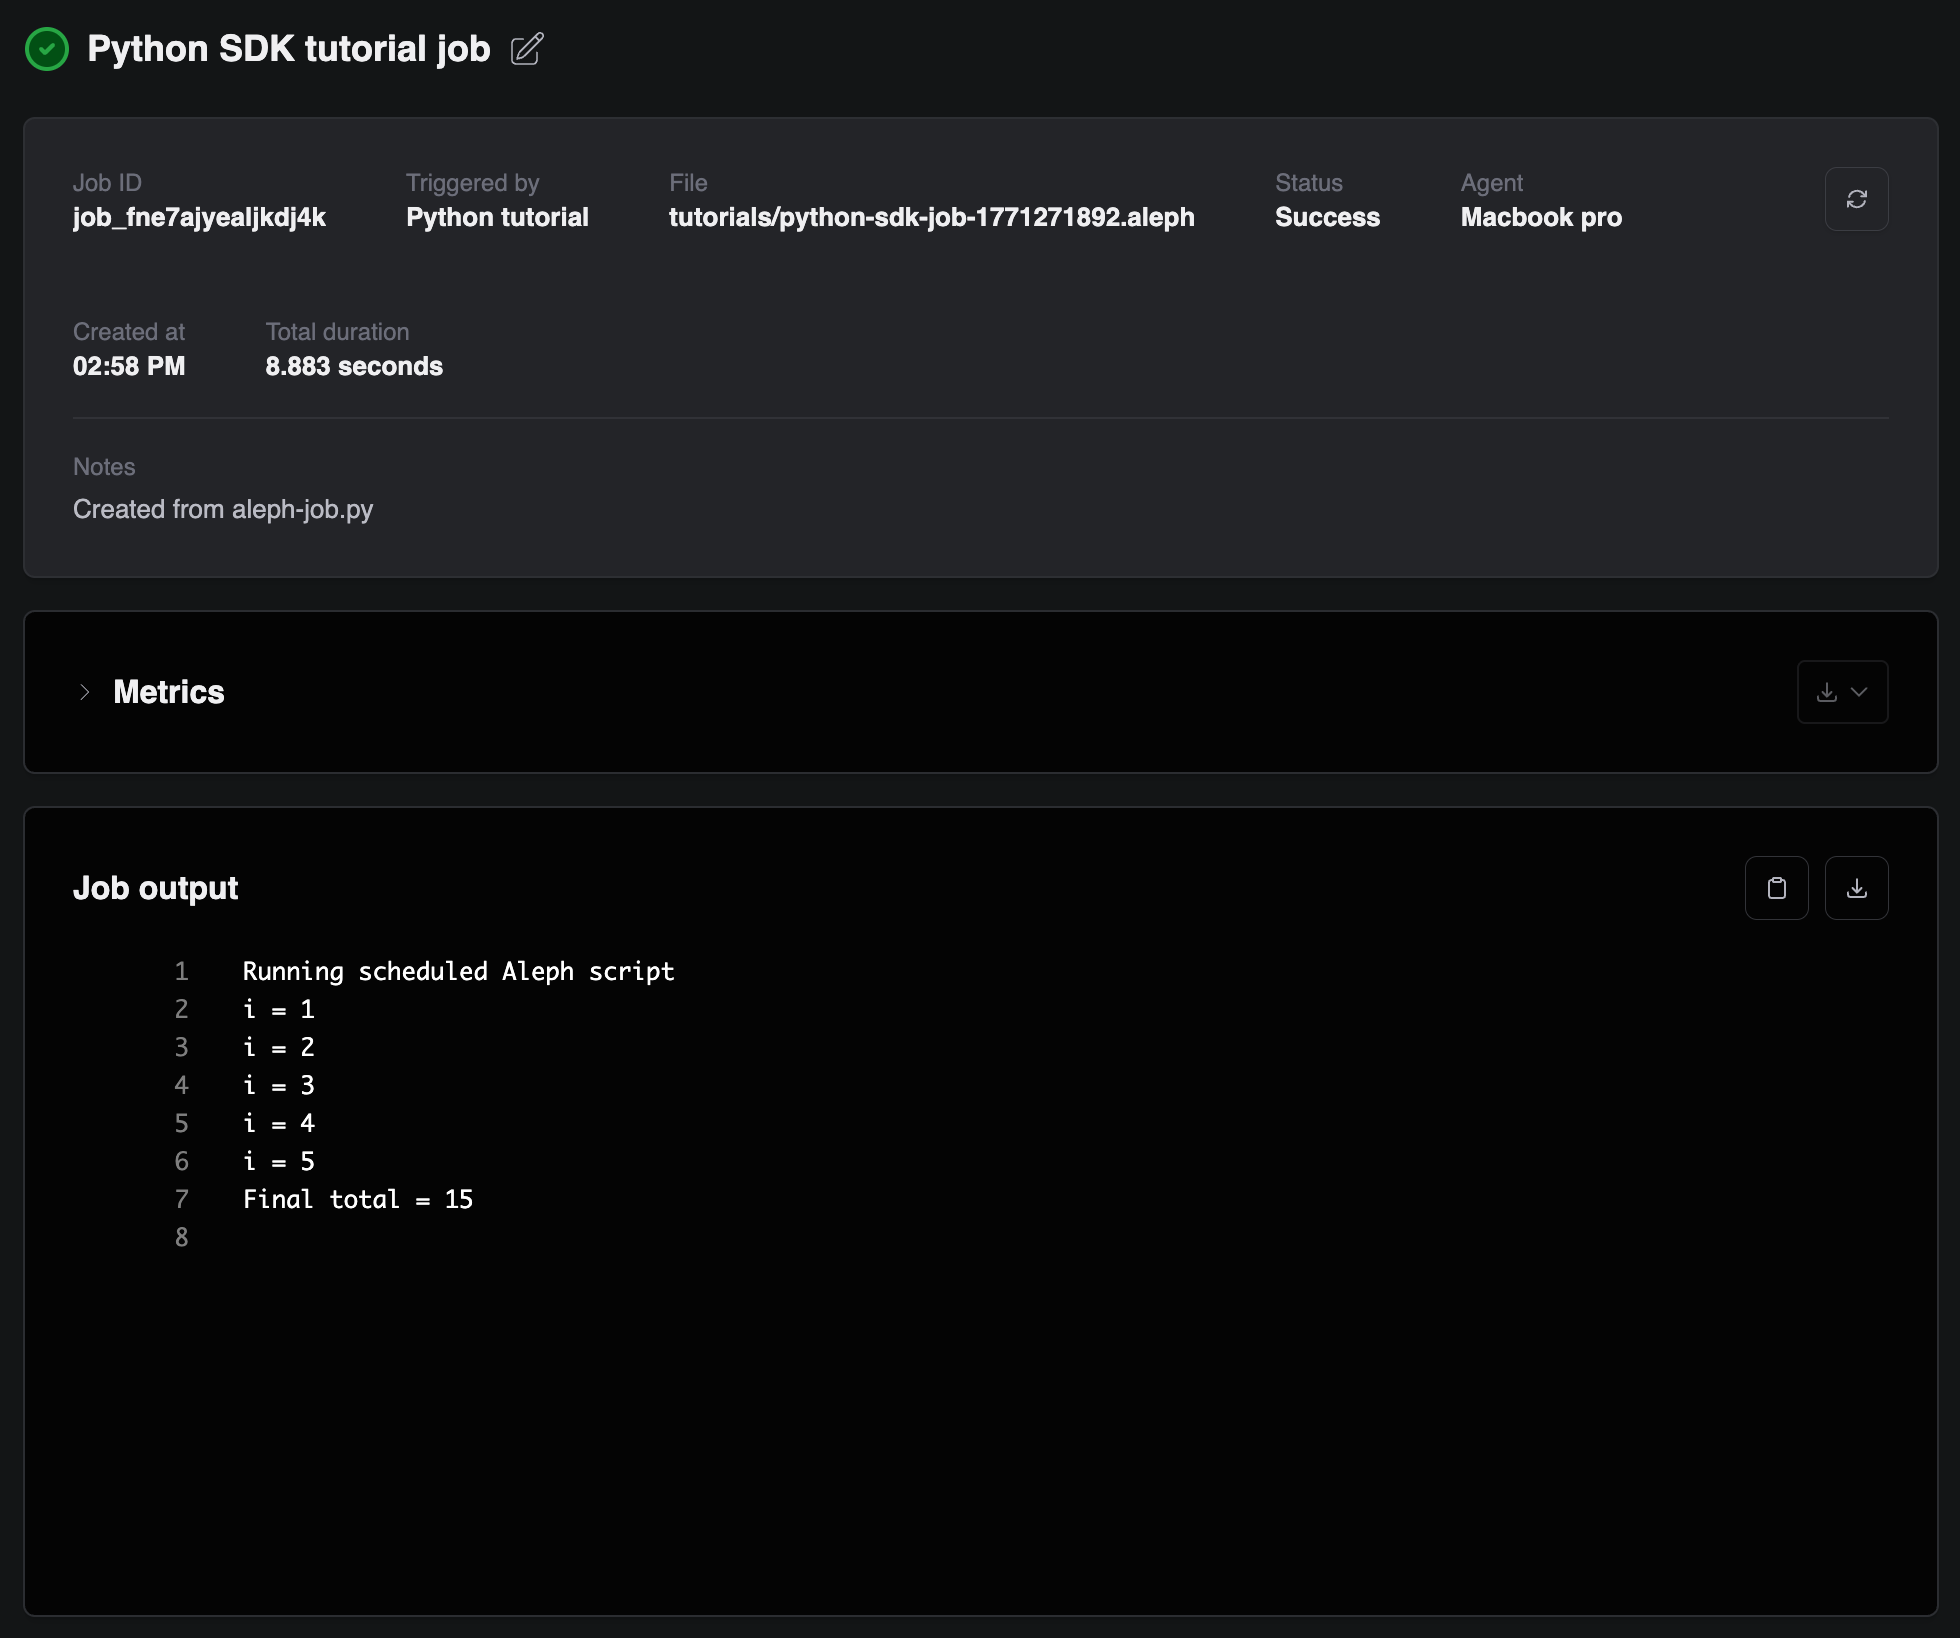
Step 7: Create the full tutorial script
Next, schedule a job.
Jobs are also asynchronous, but unlike direct executions they are persistent in The Forge.
A job needs an Aleph script file saved in the workspace files before it can execute.
Because jobs are persistent, poll for updates and check both isTerminated and status to determine when a job is done.
The script does the following:
- Creates an Aleph script file in your workspace.
- Schedules a job on a regular agent.
- Polls the job until it finishes.
- Prints job output.
- Deletes the Aleph script file.
Create aleph-job.py:
import sys
import time

from kotharcomputing import KotharClient


def main() -> None:
    if len(sys.argv) != 4:
        print(
            "Usage: python aleph-job.py <api_token> <workspace_id> <job_agent_id>"
        )
        raise SystemExit(1)

    api_token, workspace_id, agent_job_id = sys.argv[1:4]

    client = KotharClient(access_token=api_token)
    workspace = client.workspaces.id(workspace_id)

    script_path = f"tutorials/python-sdk-job-{int(time.time())}.aleph"
    scheduled_script = """
print("Running scheduled Aleph script")

var total = 0
for(i: [1..6])
{
    total += i
    print("i = " + string(i))
}

print("Final total = " + string(total))
""".strip()

    print(f"Creating script file: {script_path}")
    workspace.files.path(script_path).create(content=scheduled_script)

    try:
        print("Scheduling job...")
        job = workspace.jobs.create(
            {
                "agentId": agent_job_id,
                "path": script_path,
                "name": "Python SDK tutorial job",
                "notes": "Created from aleph-job.py",
            }
        )
        job_id = job["id"]
        print(f"Job created: {job_id}")

        latest_job = job
        while True:
            latest_job = workspace.jobs.id(job_id).get()
            print(f"[job] status: {latest_job['status']}")
            if latest_job["isTerminated"]:
                break
            time.sleep(2)

        if latest_job["status"] != "success":
            raise RuntimeError(f"Job ended with status: {latest_job['status']}")

        print("Job output:")
        print(workspace.jobs.id(job_id).output())
    finally:
        print(f"Deleting script file: {script_path}")
        workspace.files.path(script_path).delete()


if __name__ == "__main__":
    main()
Step 8: Run the full script
python aleph-job.py "<your_api_token>" "<your_workspace_id>" "<your_job_agent_id>"
The job should run and print the output.
You can also find it in the Workshop under the Jobs section.
Optional: list your agents from Python
If you want to discover agent IDs in code, list agents for your user:
from kotharcomputing import KotharClient

client = KotharClient(access_token="<your_api_token>")
agents = client.agents.list(for_user_id="<your_user_id>")

for agent in agents["items"]:
    print(agent["id"], agent["name"], agent["status"], agent["capabilities"])
Your user ID is the same as your personal workspace ID, so you can use the workspace ID instead:
agents = client.agents.list(for_user_id="<your_workspace_id>")
Pick an online agent with the capabilities you need (direct-execution and/or job).
Troubleshooting
- Invalid command usage: pass all 3 required arguments to
aleph-job.py(api_token,workspace_id,job_agent_id). - Authentication errors: verify the token is valid and has the required permissions.
- Execution or job failures: check agent status in the Workshop and inspect
job_client.output()for script errors.
What's next
- Split this script into reusable functions or a small CLI.
- Add retries and stronger error handling for production use.
- Explore the API and endpoint details in API and SDKs.