Parameterized Scripts and Data I/O
When running computational experiments, you often need to execute the same script with different parameters and store the results in a structured way for later analysis. Aleph provides two features that make this workflow straightforward:
get_argdeclares typed script arguments that the Forge exposes as input fields when you trigger an execution or schedule a job.HDF5Filereads and writes structured data files in your workspace using the HDF5 format, a widely-used standard for scientific data.
This tutorial walks you through both features and combines them into a practical workflow.
What you will build
By the end of this tutorial, you will:
- Declare typed script arguments with
get_argand see them in the Forge UI. - Write scalars, lists, and metadata to an HDF5 file.
- Read data back from an HDF5 file.
- Combine both features into a complete parameterized script that saves results across multiple runs.
Prerequisites
This tutorial assumes you are familiar with the Aleph language basics covered in Aleph 101, including variables, loops, lists, and print.
- A workspace with a running agent.
- Familiarity with the Workshop editor.
Part 1: Script Arguments with get_arg
Declaring arguments
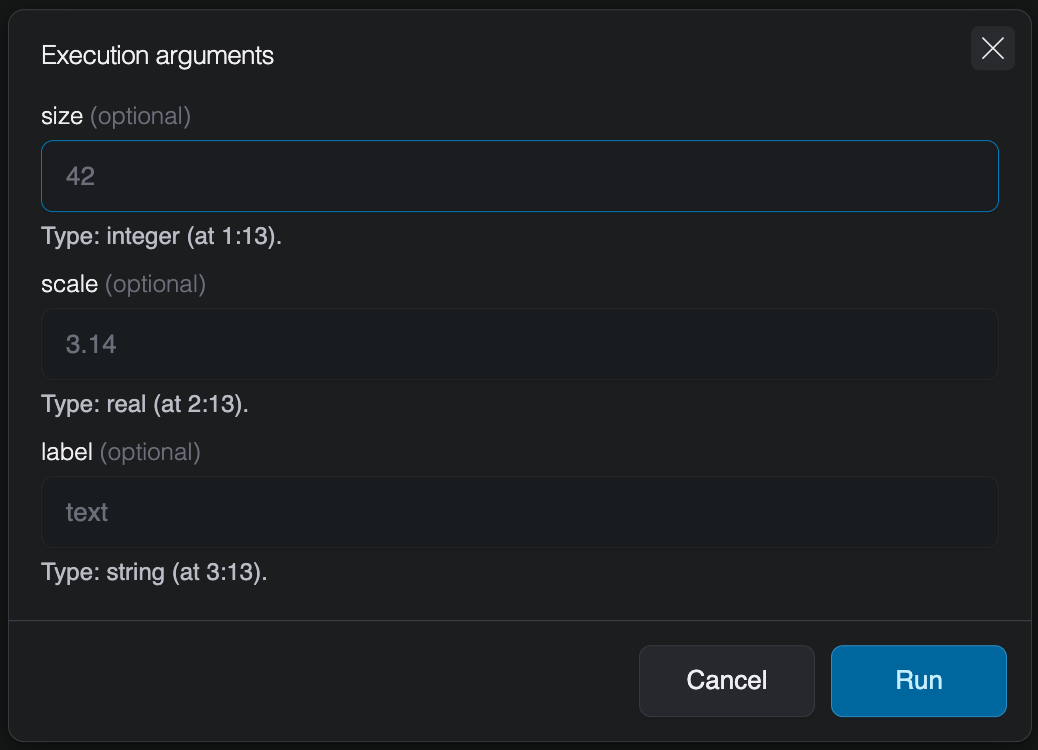
The get_arg function lets you declare named, typed parameters for your script. When the script contains get_arg calls, the Forge automatically displays input fields for each argument when you trigger an execution or schedule a job. This means you can re-run the same script with different parameters without editing the source code.
var size  = get_arg("size",  as_integer, 20)
var scale = get_arg("scale", as_real,    1.0)
var label = get_arg("label", as_string,  "default")

print("Running with size=${size}, scale=${scale}, label=${label}")
Each get_arg call takes three arguments:
- Name — a string identifying the argument (e.g.,
"size"). - Type tag — one of
as_integer,as_real,as_bool,as_complex, oras_string. - Default value (optional) — returned when the argument is not provided at execution time.
The argument name must be a string literal (e.g., "size"), not a variable. The Forge parses the source text of the script to discover arguments before execution begins.
Supported types
| Type tag | Aleph type | Example |
|---|---|---|
as_integer | integer | get_arg("count", as_integer, 5) |
as_real | real | get_arg("threshold", as_real, 0.5) |
as_bool | bool | get_arg("verbose", as_bool, false) |
as_complex | complex | get_arg("phase", as_complex, 1 + 0i) |
as_string | string | get_arg("label", as_string, "run") |
Required vs. optional arguments
When you omit the default value, the argument becomes required. If the user does not provide it at execution time, the script throws an exception:
// This will throw an exception if "output_file" is not provided
var output_file = get_arg("output_file", as_string)
A get_arg call without a default value will cause the script to fail if the argument is not provided. Use a default value when a reasonable fallback exists, and omit the default only when the argument is truly required.
Seeing arguments in the Forge
Once you save a script that contains get_arg calls, the Forge detects them automatically. When you trigger an execution or schedule a job, the UI displays typed input fields for each declared argument. Each field shows the argument name, whether it is optional or required, and the expected type.
Only the entry-point script is parsed for get_arg calls. If you use include to bring in other scripts, any get_arg calls in included files will not be detected by the Forge.
Part 2: Reading and Writing Data with HDF5File
Creating a file and writing data
The HDF5File class lets you create and interact with HDF5 files directly from your scripts. The constructor takes a file path and an optional mode string:
var f = HDF5File("results.h5", "w")

// Write scalar values
f.write("/parameters/size", 20)
f.write("/parameters/scale", 1.5)

// Write a list of values
f.write("/data/values", [0.0, 1.5, 3.0, 4.5, 6.0])

print("Data written to results.h5")
Dataset paths use / separators to create a hierarchical structure. Intermediate groups (like /parameters and /data above) are created automatically.
File paths passed to HDF5File are always relative to the root of the workspace, regardless of where the script itself is located. For example, HDF5File("results.h5") and HDF5File("data/results.h5") both resolve from the workspace root, even if the script is inside a subfolder.
| Mode | Behavior |
|---|---|
"a" (default) | Read/write; create the file if it does not exist |
"r" | Read-only |
"r+" | Read/write; the file must already exist |
"w" | Create a new file; truncate if it already exists |
"w-" or "x" | Create a new file; fail if it already exists |
Method chaining
The write method returns the HDF5File instance, so you can chain multiple writes together for concise code:
HDF5File("results.h5", "w")
    .write("/parameters/size", 20)
    .write("/parameters/scale", 1.5)
    .write("/data/values", [0.0, 1.5, 3.0, 4.5, 6.0])
Adding metadata with attributes
Datasets and groups can carry lightweight key-value metadata called attributes. Use write_attribute to attach metadata and read_attribute to retrieve it:
var f = HDF5File("results.h5")
f.write_attribute("/data/values", "units", "arbitrary")
f.write_attribute("/data/values", "description", "Scaled sequence of integers")
f.write_attribute("/", "created_by", "data_generator.aleph")
When you write a dataset, the Forge automatically attaches a set of traceability attributes:
| Attribute | Description |
|---|---|
kothar_aleph_type | The Aleph type of the data that was written |
kothar_execution_id | The identifier of the execution that wrote the dataset |
kothar_user_id | The identifier of the user who launched the execution |
kothar_workspace_id | The workspace where the execution took place |
written_at | Timestamp of when the dataset was written |
These attributes let you trace any dataset back to the exact execution, user, and workspace that produced it. You can read them like any other attribute using read_attribute.
Reading data back
Use the read method with a type specification to load data from an HDF5 file. For scalars, pass a single type tag. For collections, combine a value type and a container type with the | operator:
var f = HDF5File("results.h5", "r")

// Read scalars
var size = f.read("/parameters/size", as_integer)
var scale = f.read("/parameters/scale", as_real)

// Read a list
var values = f.read("/data/values", as_real | as_list)

// Read an attribute
var units = f.read_attribute("/data/values", "units", as_string)

print("Size: ${size}, Scale: ${scale}")
print("Values: ${values}")
print("Units: ${units}")
Use as_real | as_list to read a list of real numbers, as_integer | as_list for a list of integers, or just as_real for a single scalar. The type specification must match the stored data — reading a list with a scalar type tag will produce an error.
Beyond scalars and lists
This tutorial focuses on scalars and lists, but HDF5File also supports reading and writing advanced linear algebra and tensor types:
| Container tag | Types | Example |
|---|---|---|
as_array | RealArray, IntegerArray, ComplexArray, BoolArray | f.read("/data", as_real | as_array) |
as_matrix | RealMatrix, ComplexMatrix | f.read("/data", as_real | as_matrix) |
as_tensor | RealTensor, ComplexTensor | f.read("/data", as_complex | as_tensor) |
as_sparsematrix | RealSparseMatrix, ComplexSparseMatrix | f.read("/data", as_real | as_sparsematrix) |
Writing is just as straightforward — pass any of these types directly to write:
var matrix = RealMatrix(3, 3)
f.write("/results/density_matrix", matrix)
For the full list of supported types and overloads, see the read and write method references.
Inspecting file contents
HDF5File provides several methods to explore what's inside a file without reading the actual data:
var f = HDF5File("results.h5", "r")

// Check if a dataset exists
print(f.exists("/data/values"))        // true

// List datasets in a group
print(f.list_datasets("/parameters"))  // ["size", "scale"]

// List groups at the root level
print(f.list_groups())                 // ["parameters", "data"]

// Get the shape of a dataset
print(f.shape("/data/values"))         // [5]
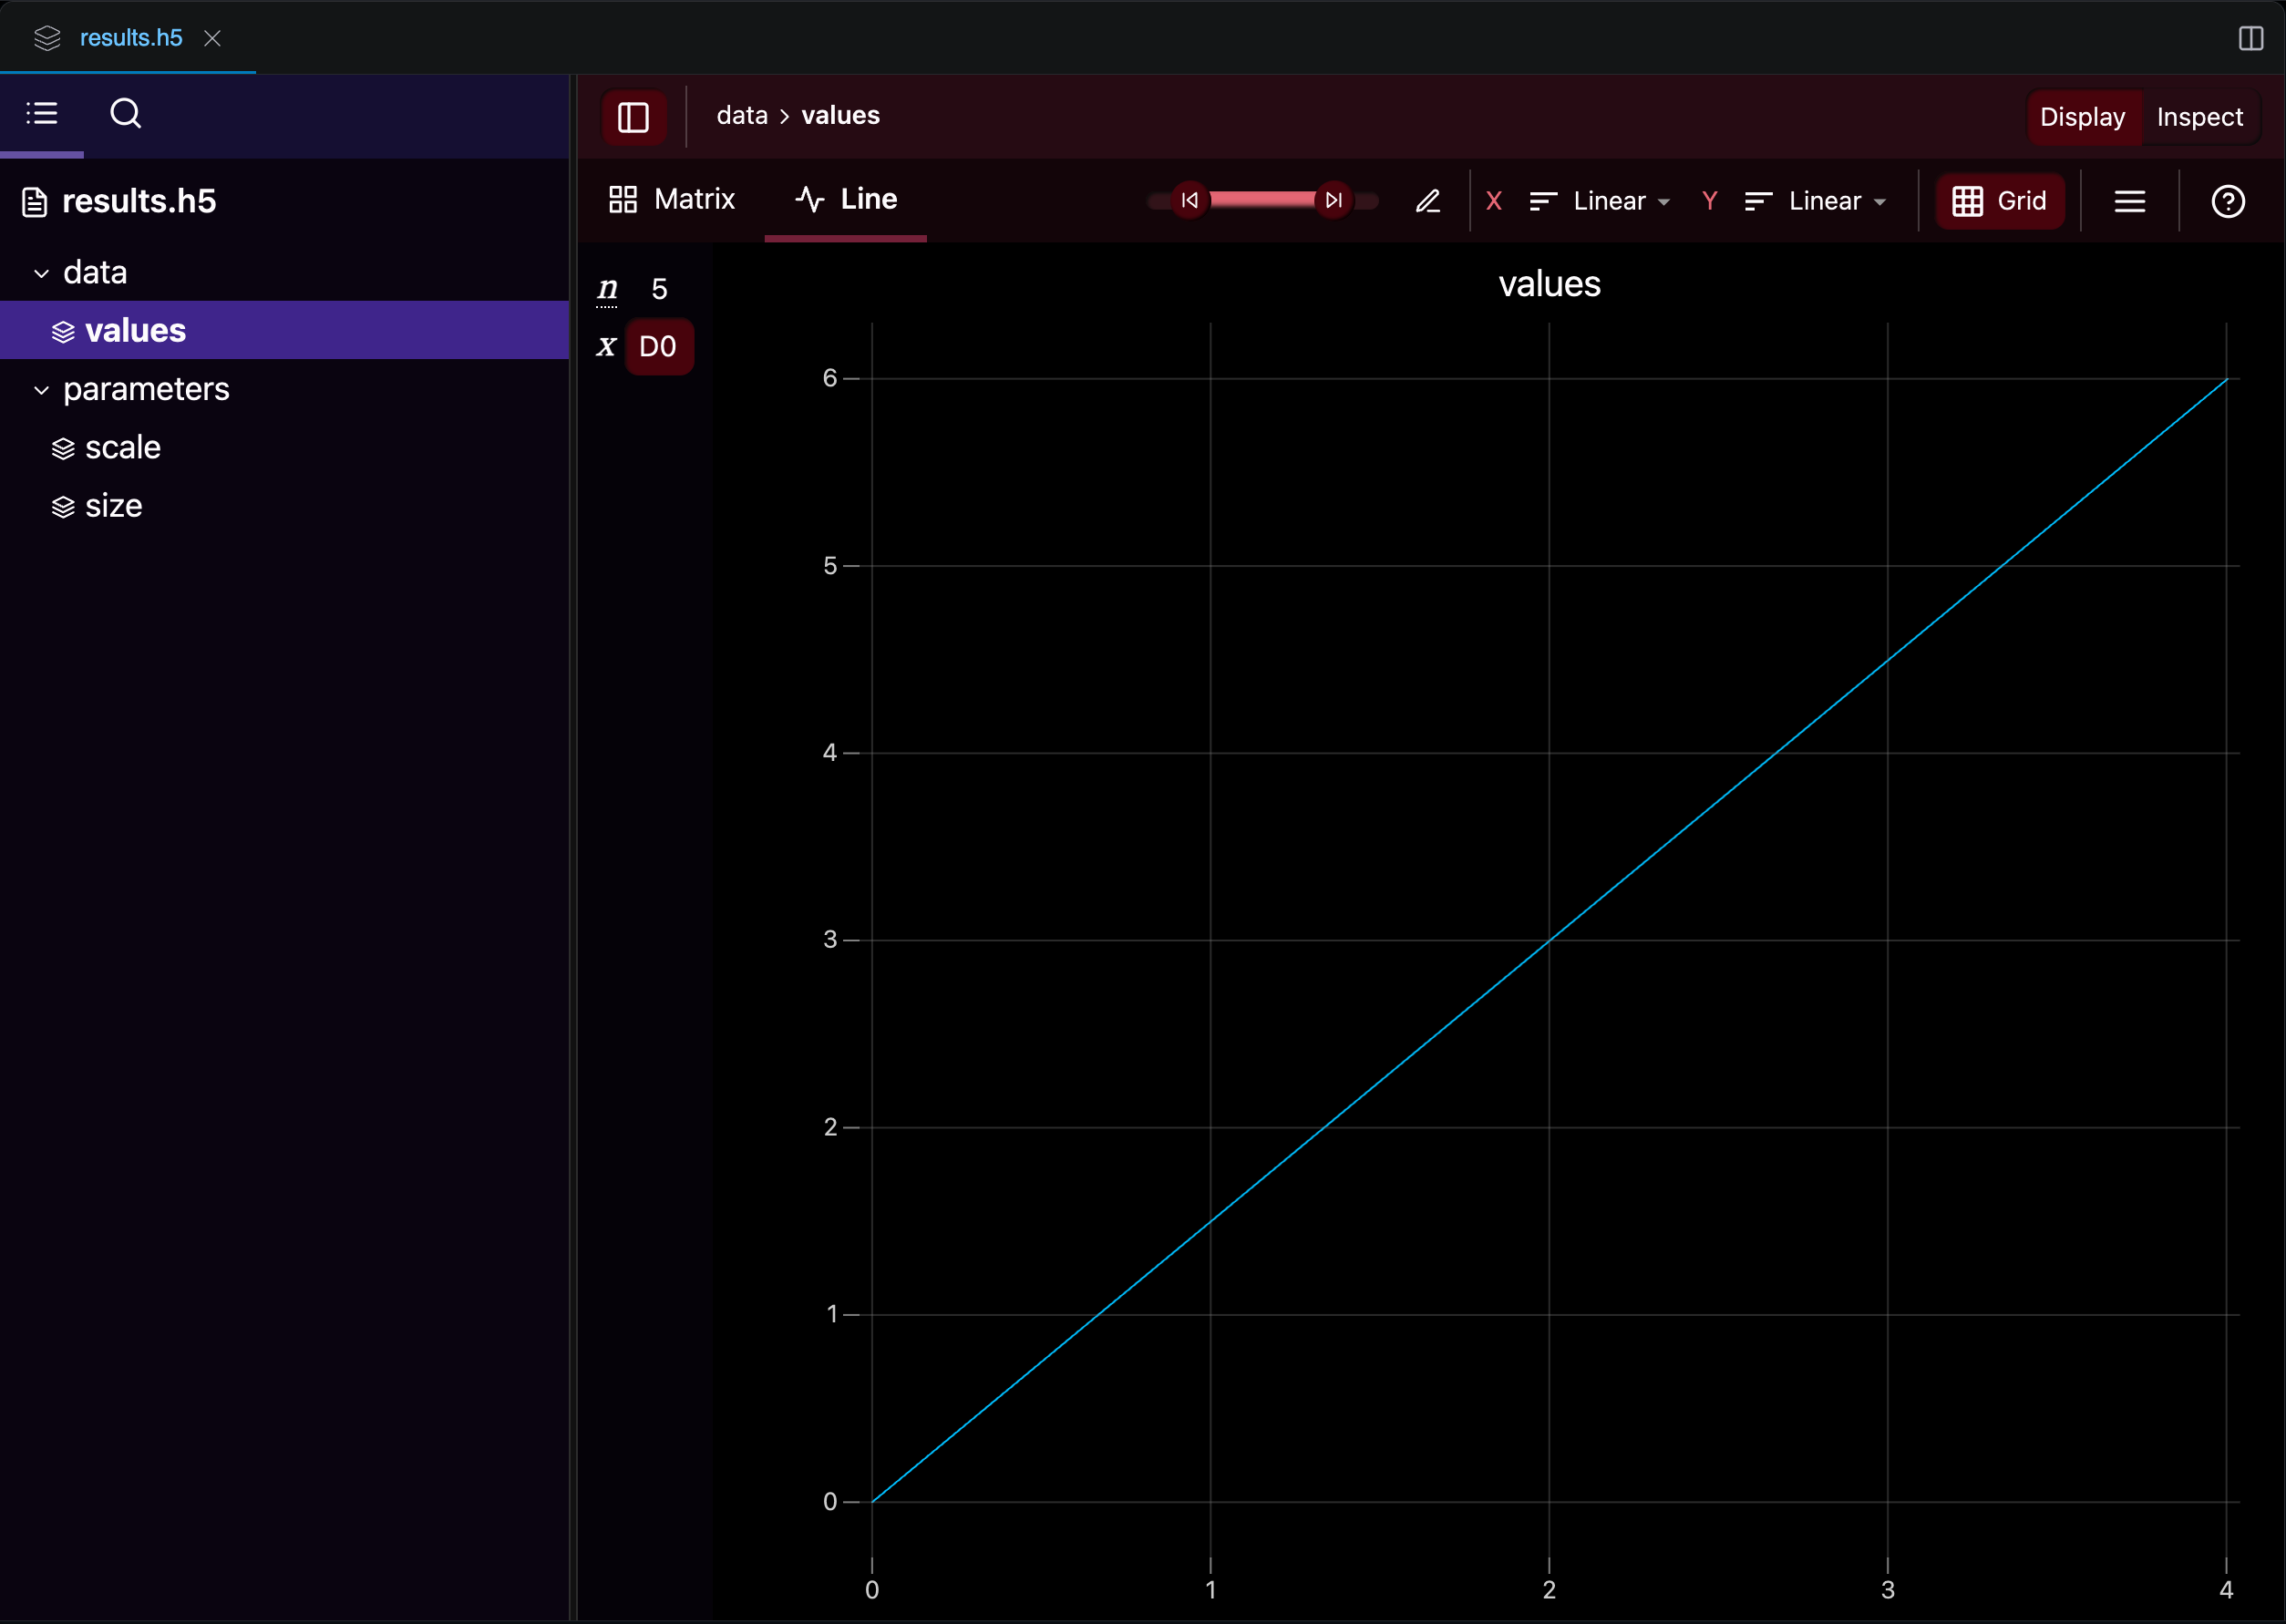
After an execution completes, the HDF5 file appears in your workspace. You can browse its groups and datasets in the Workshop file explorer, which also provides built-in visualizations for numerical data:
Part 3: Putting It All Together
Now let's combine get_arg and HDF5File into a complete, practical workflow. We will write a script that generates a dataset based on user-provided parameters and saves everything to an HDF5 file.
The complete script
Create a new script called data_generator.aleph in your workspace:
// ── Script arguments ─────────────────────────────────────
var size   = get_arg("size",   as_integer, 20)
var scale  = get_arg("scale",  as_real,    1.0)
var offset = get_arg("offset", as_real,    0.0)
var label  = get_arg("label",  as_string,  "default")

// ── Generate data ────────────────────────────────────────
var values = []
for (var i = 0; i < size; ++i)
{
    values.push_back(scale * i + offset)
}

// ── Compute summary statistics ───────────────────────────
var total = 0.0
for (v : values)
{
    total += v
}
var mean = total / size

print("Generated ${size} values (scale=${scale}, offset=${offset})")
print("Range: ${values.front()} to ${values.back()}")
print("Mean:  ${mean}")

// ── Save results to HDF5 ────────────────────────────────
var group = "/runs/${label}"

HDF5File("experiment_results.h5")
    .write("${group}/values", values)
    .write("${group}/size", size)
    .write("${group}/scale", scale)
    .write("${group}/offset", offset)
    .write("${group}/mean", mean)
    .write_attribute(group, "description", "Generated with size=${size}, scale=${scale}, offset=${offset}")

print("Results saved to experiment_results.h5 under ${group}")
Let's walk through the key sections:
- Script arguments: The four
get_argcalls declare the parameters.sizecontrols how many values to generate,scaleandoffsetdefine the linear formulascale * i + offset, andlabeltags the run. - Data generation: A simple loop builds a list of values using the formula.
- Statistics: We compute the mean by summing all values.
- HDF5 output: Results are saved under
/runs/${label}/, so each execution with a different label gets its own group in the file.
The label argument lets you tag each execution. Because each run is saved to its own group in the HDF5 file, running the script multiple times with different labels accumulates all results in a single file.
Running the script
- Save the script as
data_generator.alephin the Workshop. - Click Run (or schedule a job).
- The Forge displays four input fields:
size,scale,offset, andlabel. - Fill in the values you want to explore — or leave them at their defaults — and execute.
Try running it a few times with different parameters, for example:
| Run | size | scale | offset | label |
|---|---|---|---|---|
| 1 | 20 | 1.0 | 0.0 | baseline |
| 2 | 20 | 2.5 | 0.0 | scaled |
| 3 | 50 | 1.0 | 10.0 | with_offset |
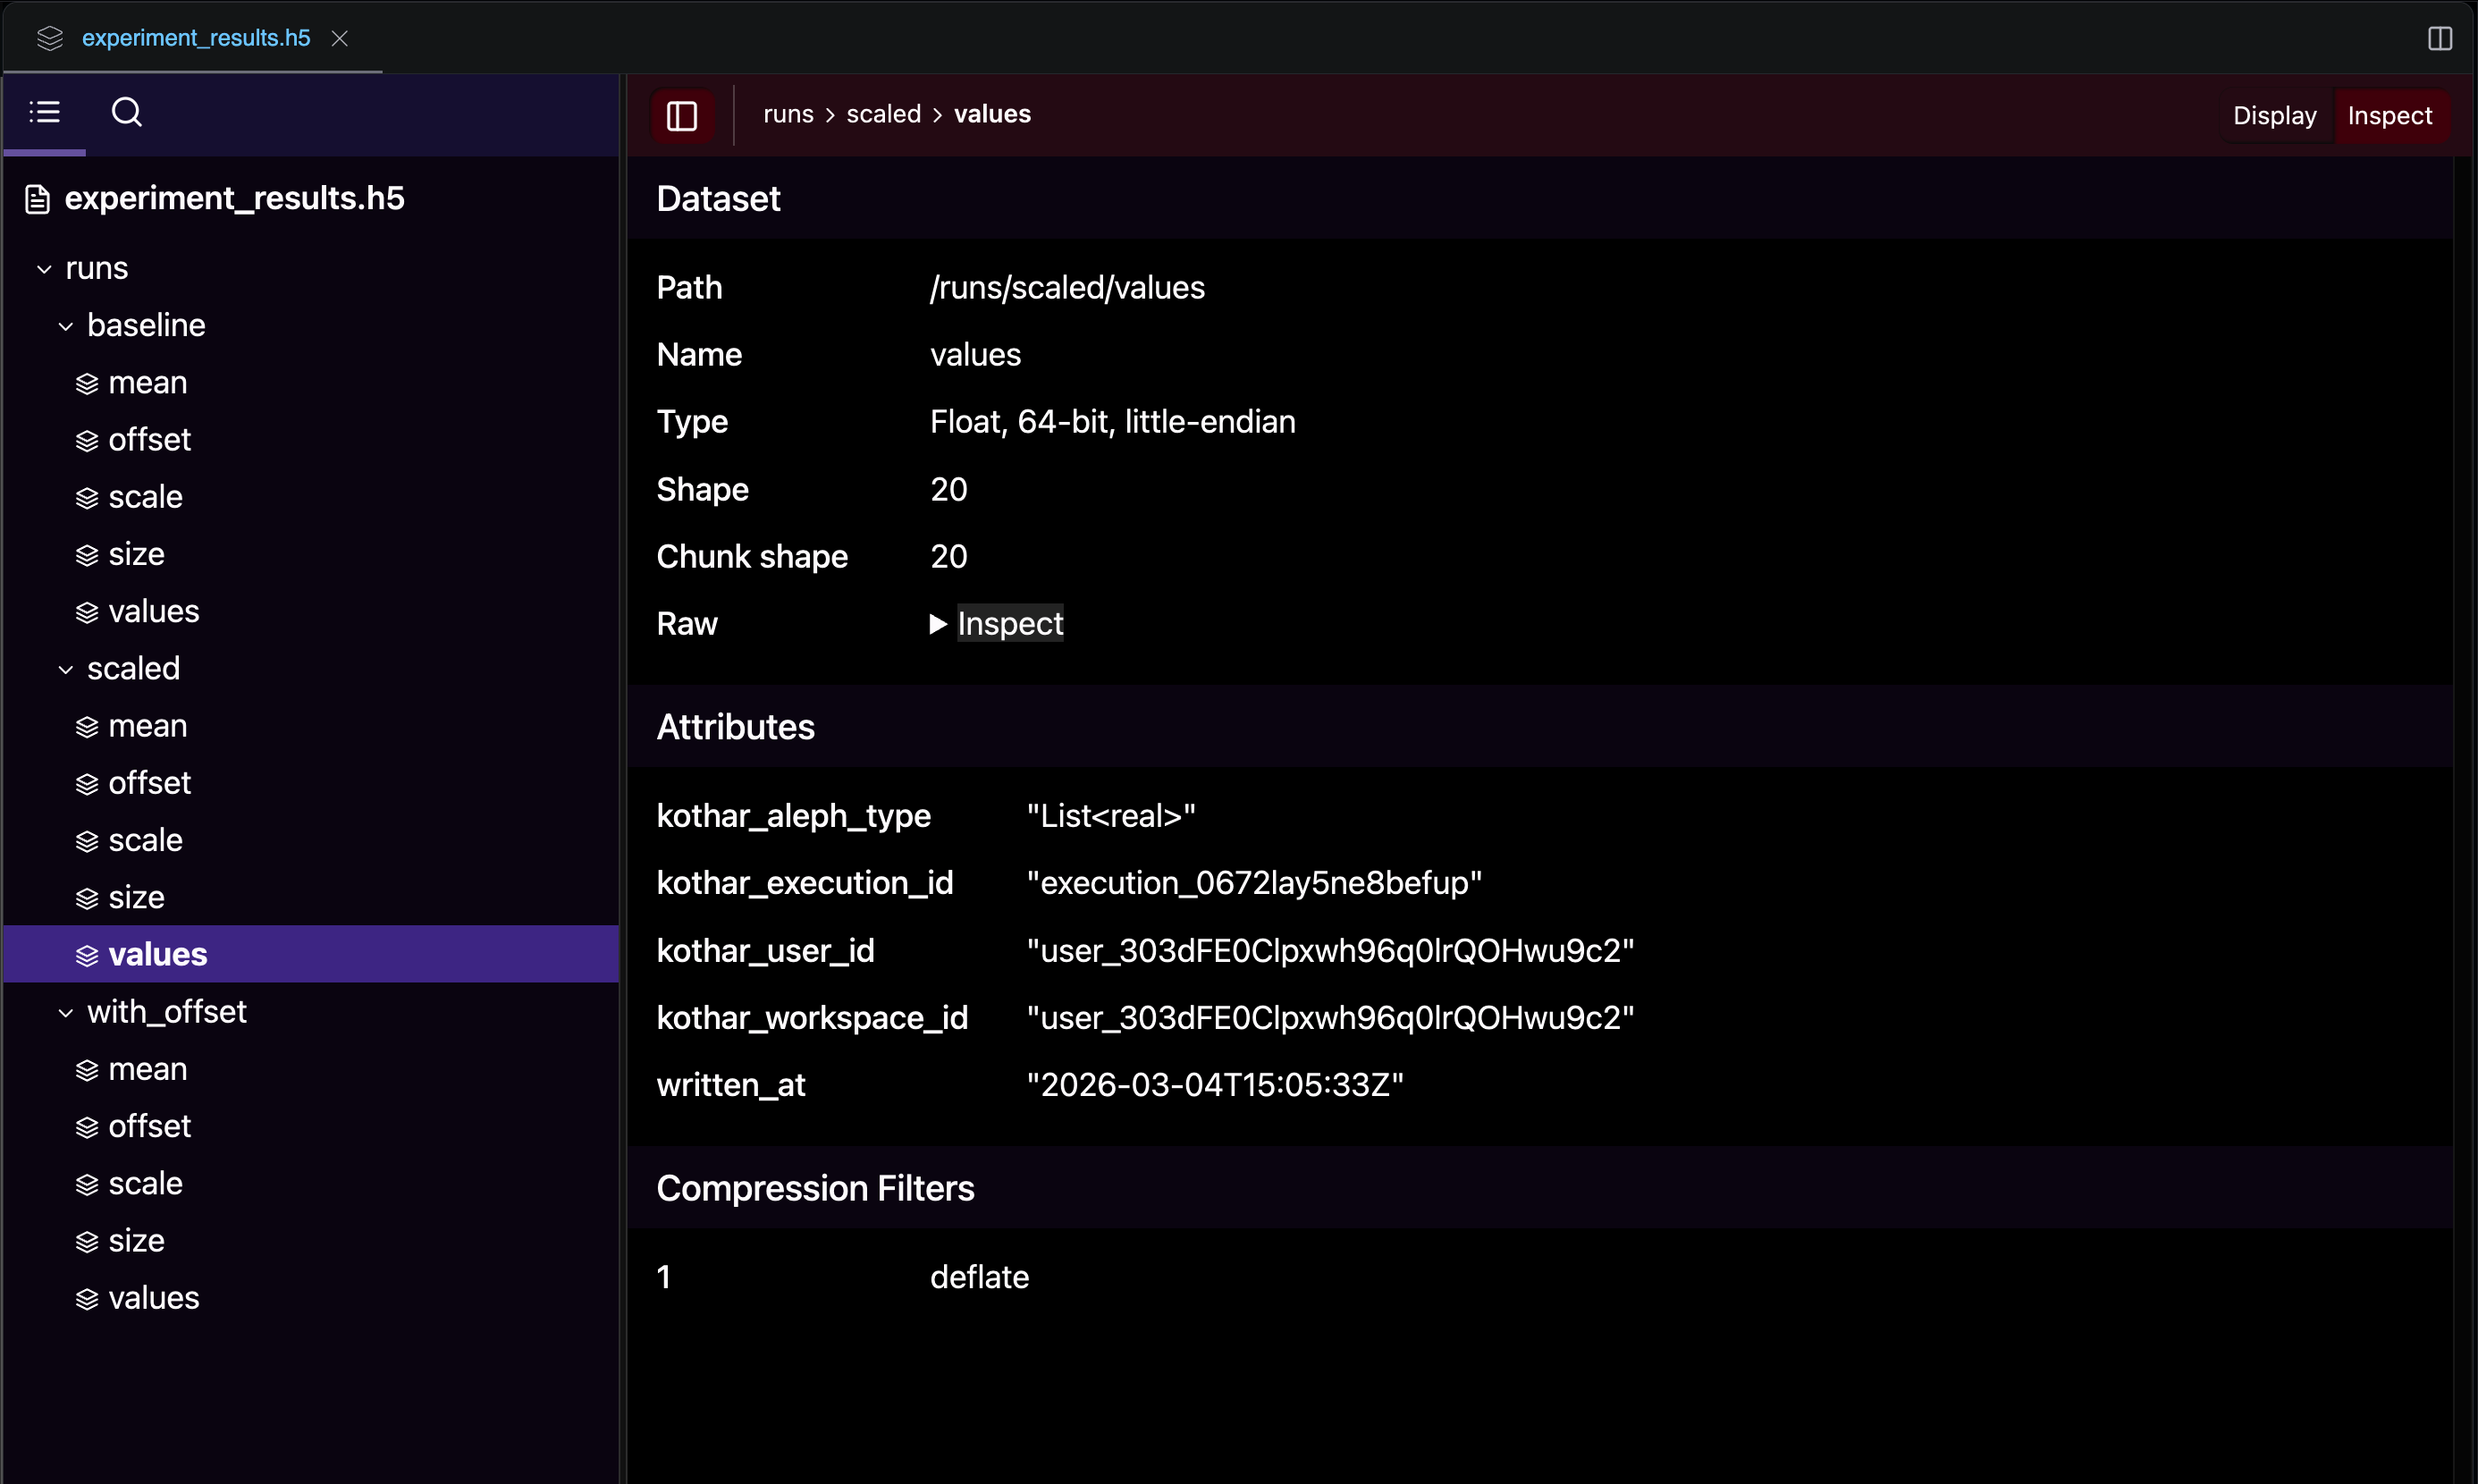
After the three runs, the file explorer shows the resulting experiment_results.h5 file with one group per run. Notice the automatic traceability attributes (kothar_execution_id, written_at, etc.) attached to each dataset:
Reading results from a previous run
After running the script, you can load the results from a new script or a subsequent execution:
var f = HDF5File("experiment_results.h5", "r")

// List all run groups
var runs = f.list_groups("/runs")
print("Available runs: ${runs}")

// Read back a specific run
var values = f.read("/runs/baseline/values", as_real | as_list)
var mean   = f.read("/runs/baseline/mean", as_real)
var desc   = f.read_attribute("/runs/baseline", "description", as_string)

print("Values: ${values}")
print("Mean:   ${mean}")
print("Description: ${desc}")
Part 4: Accumulating Results Across Runs
Because HDF5File defaults to "a" (append) mode, running the script multiple times with different labels naturally builds up a dataset in a single file. This is useful for comparing results across parameter configurations.
Here is a reader script that iterates over all runs and prints a summary:
var f = HDF5File("experiment_results.h5", "r")
var runs = f.list_groups("/runs")

for (run_name : runs)
{
    var path   = "/runs/${run_name}"
    var size   = f.read("${path}/size", as_integer)
    var scale  = f.read("${path}/scale", as_real)
    var offset = f.read("${path}/offset", as_real)
    var mean   = f.read("${path}/mean", as_real)

    print("${run_name}: size=${size}, scale=${scale}, offset=${offset} -> mean=${mean}")
}
After the three runs from the table above, this script would output:
baseline: size=20, scale=1, offset=0 -> mean=9.5
scaled: size=20, scale=2.5, offset=0 -> mean=23.75
with_offset: size=50, scale=1, offset=10 -> mean=34.5
Use meaningful labels when running the script (e.g., "baseline", "high_scale", "N50") to make it easy to identify runs later. The label becomes the group name in the HDF5 file.
If you need labels that are guaranteed to be unique, you can use the Forge environment constants — for example, execution_id gives each execution a unique identifier:
var label = get_arg("label", as_string, execution_id)
What's next?
- Visualize your results using the Plotting module.
- Automate parameter sweeps by launching executions programmatically with the Python SDK.
- Store matrices and tensors in HDF5 for more advanced workflows — see the full
HDF5Filereference. - Explore all argument types and constraints in the
get_argreference.